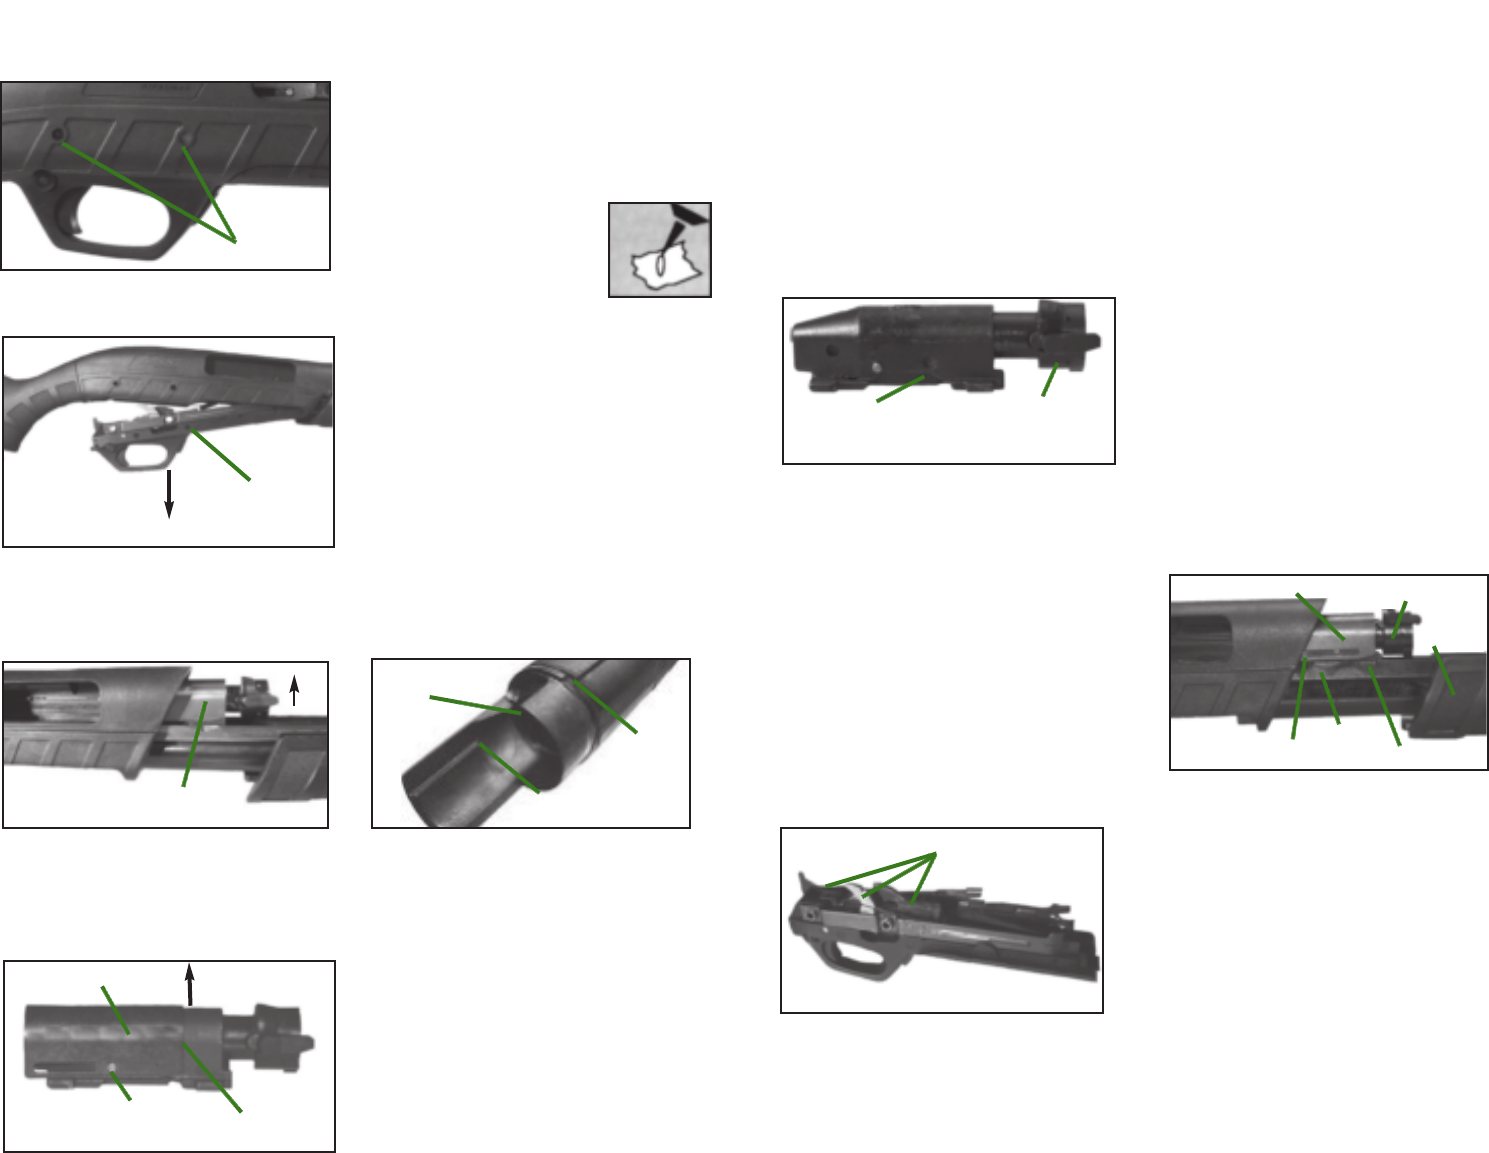
To Remove the Trigger Assembly:
1. Tap out the front and rear trigger assembly
pins with a drive punch. See Picture 15.
2. Remove the trigger assembly from the
receiver by pulling downward. See
Picture 16.
To Remove the Bolt Slide Assembly:
1. With the barrel and trigger assembly
removed, move the fore-end forward until
bolt assembly is free of receiver. See
Picture 17.
2. Remove bolt assembly from action bars
by lifting bolt assembly upward.
3. Remove port cover from the bolt assem-
bly by lifting port cover over the port
cover guide pin then lift upward. See
Picture 18.
To Clean Barrel:
WARNING! The use of a non recommended
lubricant or cleaner could adversely affect the
function and safe operation of your shotgun.
1. Use the instructions and equipment pro-
vided in a quality cleaning kit such as a
Remington® Cleaning Kit. For recom-
mendations, see your dealer or a
Remington® Authorized Gunsmith.
2 Saturate cleaning patch
with Brite Bore™ or equiva-
lent.
3. Attach the patch to a clean-
ing rod tip.
4. Pass the patch through
bore from the chamber end to the muzzle
several times removing loose residue and
fouling.
5. Select the correct caliber cleaning brush
and attach a brush to the cleaning rod.
6. Spray bore brush with Brite Bore.
7. Push the cleaning rod through the barrel
several times.
8. Remove the brush from the rod and attach
a tip with a cleaning patch.
9. Push the cleaning patch through the bore.
10. Repeat several times using a new cleaning
patch each time until the patch is removed
from the barrel without fouling residue.
11. Remove all shooting residue from the lock
notch in barrel with Rem™ Action Cleaner.
See Picture 19.
12. Push a clean patch saturated with Rem™
Oil through the barrel.
13. Push a clean dry patch through the barrel
to remove excess lubricant.
14. Apply a light application of Rem™ Oil to
the outside of the barrel extension with a
soft clean cloth.
WARNING! After cleaning, make sure the bar-
rel is free of obstructions.
To Clean the Choke Tube:
WARNING! The use of a non recommended
lubricant or cleaner could adversely affect the
function and safe operation of your shotgun.
1. Remove the choke tube from the barrel.
See “To Change the Choke Tube”, page 11.
14
2. Clean the choke tube, including the
threads, with Rem™ Action Cleaner and
wipe clean.
3. When dry, apply Rem™ Oil to the choke
tube threads and reattach to barrel. See
“To Change the Choke Tube”, page 11.
To Clean the Bolt Assembly:
WARNING! The use of a non recommended
lubricant or cleaner could adversely affect the
function and safe operation of your shotgun.
1. Spray the bolt assembly and bolt head
using Rem™ Action Cleaner and brush.
See Picture 20.
2. Wipe clean and let dry before applying a
light application of Rem™ Oil to the bolt
assembly and bolt head.
To Clean the Trigger Assembly:
WARNING: The use of a non-recommend-
ed lubricant could adversely affect the func-
tion and safe operation of your shotgun.
1. Thoroughly spray Rem™ Action Cleaner
inside the trigger assembly where speci-
fied in Picture 21. Air dry or use com-
pressed air to thoroughly dry the trigger
assembly.
2. Apply a light application of Rem™ Oil to
the areas specified in Picture 21.
To Clean the Receiver Assembly:
WARNING! The use of a non recommended
lubricant or cleaner could adversely affect the
function and safe operation of your shotgun.
1. Thoroughly spray and brush all compo-
nents inside the receiver using Rem™
Action Cleaner.
2. Air dry or use compressed air to thor-
oughly dry the receiver assembly.
3. Spray the outside of the magazine tube
with Rem™ Action Cleaner and wipe
clean.
4. Wipe with a clean cloth and air dry or use
compressed air to thoroughly dry the
magazine tube.
5. Apply a light application of Rem™ Oil to
the outside of the magazine tube and
metal surfaces inside the receiver.
To Reassemble The Firearm:
WARNING! Visually check the chamber,
ejection port, and magazine to make sure that
the shotgun is completely unloaded and there
are no shot shells anywhere in the shotgun.
1. With the port cover guide slot on the
right side of the bolt assembly. Place the
port cover over the port cover guide pin
on the bolt assembly then snap the top of
the port cover into place. See Picture 18.
2. Place Fore-end onto magazine tube with
action bars bolt cuts in the up position as
shown in Picture 22.
3. While holding the action bars with one
hand, place the bolt assembly onto action
bars with bolt head oriented toward the
front of the receiver.
4. Align the action bars and bolt assembly
with the right and left action rails in the
receiver.
5. Move the fore-end rearward, sliding the
bolt assembly halfway rearward.
6. Insert the barrel into the receiver and
align the barrel ring over the magazine
tube. See Picture 7.
7. Replace the magazine cap on top of the
magazine. Secure by turning clockwise
until hand tight. Do not over tighten.
8. Insert the trigger assembly by aligning
the front notch into receiver.
See Picture 23.
15
Locking notch
PICTURE 19
Barrel
PICTURE 17
Barrel
Extension
PICTURE 20
Bolt Assembly
Bolt Head
PICTURE 21
Spray with Rem
TM
Oil
Trigger Plate Assembly
PICTURE 18
Bolt Assembly
Bolt Assembly
Port Cover
Port Cover Guide Pin
PICTURE 22
Action Bar
Bolt Assembly
Port Cover
Fore-End
Bolt Carrier Tab
Port Cover Guide Slot
Trigger Plate Pins
PICTURE 15
PICTURE 16
Trigger
Assembly
e5762remington_Q6.qxp 9/25/09 11:06 AM Page 8
 (24 pages)
 Manymanuals.com
 Manymanuals.de
 Manymanuals.fr
 Manymanuals.it
 Manymanuals.pl
 Manymanuals.cz
 Manymanuals.es
 Manymanuals-pt.com
Comments to this Manuals