Remington RM5520R Operator's Manual

Browse online or download Operator's Manual for Power chainsaws Remington RM5520R. Remington RM5520R Operator`s manual User Manual

  • Download
  • Add to my manuals
  • Print
  • Page
    / 24
  • Table of contents
  • TROUBLESHOOTING
  • BOOKMARKS
  • Rated. / 5. Based on customer reviews
Page view 0
READ ALL INSTRUCTIONS BEFORE OPERATING
BASIC SAFETY PRECAUTIONS
DO NOT rely exclusively upon the safety devices built into the unit.
DO NOT allow the unit to be used as a toy.
Please read the entire operator’s manual carefully before attempting to assemble, operate or
maintain the unit.
Follow all safety instructions. Failure to do so can result in property damage or serious injury to
yourself and/or others.
Be thoroughly familiar with the controls and the proper use of the unit. Know how to stop the unit
and disengage the controls quickly.
Stay alert! Do not operate the unit when tired, ill or under the influence of alcohol, drugs or medication.
Never allow children to operate the unit. Never allow adults to operate the unit without proper instruction.
Make sure that all guards and safety attachments are properly installed before operating the unit.
Keep these instructions. Refer to them often and use them to instruct other users. If loaning
someone this unit, also loan them these instructions.
Keep bystanders, especially children and pets, at least 50 feet (15 m) away. If anyone enters the
work area, stop the unit!
Keep the work area clean. Cluttered areas invite injuries. Do not start cutting until the work area is clear
and free from obstructions, there is secure footing and a planned retreat path from falling branches.
Always wear appropriate eye and ear/hearing protection when operating this unit. Wear safety
goggles, or safety glasses with side shields, that are marked as meeting ANSI Z87.1-1989
standards. Failure to do so could result in serious eye injury caused by thrown or falling objects. If
the operation is dusty, wear a face mask or dust mask. Use a hard hat or other type of safety helmet.
Dress appropriately, wear heavy, snug-fitting clothes (long pants and a long sleeve shirt), non-slip
protective gloves and steel-toed safety boots. Do not wear loose clothing, jewelry, short pants,
sandals or go barefoot. Secure hair above shoulder level to prevent entanglement in moving parts.
Only use the unit in daylight or good artificial light.
Only use the unit for its intended purpose: to cut wood. Only use the unit as described in this
manual. Only use the manufacturer’s recommended attachments with this unit.
UNDERSTANDING KICKBACK
Rotational Kickback can happen when the upper tip of
the guide bar contacts an object while the chain is
moving (Fig. 1 & 2). This can cause the chain to dig into
the object and momentarily stop moving. The guide bar
is then kicked up and back toward the operator in a
lightning-fast reverse reaction.
Pinch Kickback can happen when the wood on either
side of a cut closes in and pinches the moving saw chain
along the top of the guide bar. This can cause the chain
to instantly stop. The chain force is then reversed,
causing the saw to move in the opposite direction,
sending the saw straight back toward the operator.
Pull-In can happen when the moving chain on the bottom
of the guide bar hits a foreign object inside the wood. This
can cause the chain to suddenly stop. The saw is then
pulled forward and away from the operator, which could
potentially result in the loss of control of the saw.
KICKBACK SAFETY PRECAUTIONS
DO NOT over reach.
DO NOT cut above shoulder height.
DO NOT make cuts with the tip of the guide bar (Fig. 1).
DO NOT let the tip of the guide bar contact any object,
such as a log, branch, ground or other obstruction.
Remove or avoid any obstructions that might impact the
tip of the guide bar while cutting (Fig. 3).
DO NOT cut more than one log or branch at a time.
DO NOT twist the saw when removing the guide bar
from an undercut while bucking.
DO NOT operate the unit with one hand! Serious injury to
the operator, helpers or bystanders may result from one-
handed operation. This unit is intended for two-handed
use. Always grip the unit firmly with both hands when the
engine is running. Keep the left hand on the front handle
and the right hand on the rear handle. Use a firm grip with
thumbs and fingers encircling the handles. A firm grip will
help maintain control of the unit and reduce kickback. Do
not let go! Stand slightly to the left of the unit to avoid
being in the direct line of the saw chain. Follow all the
Proper Grip on Handles instructions in the Operating Instructions section.
• IMPORTANT SAFETY INSTRUCTIONS •
Operator’s Manual
55cc 2-Cycle Chain Saw
RM5520R
TABLE OF CONTENTS
Service Information . . . . . . . . . . . . . . . . . . . . . . . . . . . . . . . . . . . . . . . . . . . . . . . . . . . . . . . . . . . . . .1
Safety Information . . . . . . . . . . . . . . . . . . . . . . . . . . . . . . . . . . . . . . . . . . . . . . . . . . . . . . . . . . . . . . .1
Know Your Unit . . . . . . . . . . . . . . . . . . . . . . . . . . . . . . . . . . . . . . . . . . . . . . . . . . . . . . . . . . . . . . . . .3
Assembly Instructions . . . . . . . . . . . . . . . . . . . . . . . . . . . . . . . . . . . . . . . . . . . . . . . . . . . . . . . . . . . .3
Oil and Fuel Information . . . . . . . . . . . . . . . . . . . . . . . . . . . . . . . . . . . . . . . . . . . . . . . . . . . . . . . . . .4
Starting and Stopping Instructions . . . . . . . . . . . . . . . . . . . . . . . . . . . . . . . . . . . . . . . . . . . . . . . . . .4
Operating Instructions . . . . . . . . . . . . . . . . . . . . . . . . . . . . . . . . . . . . . . . . . . . . . . . . . . . . . . . . . . .5
Maintenance and Repair Instructions . . . . . . . . . . . . . . . . . . . . . . . . . . . . . . . . . . . . . . . . . . . . . . . .6
Cleaning and Storage . . . . . . . . . . . . . . . . . . . . . . . . . . . . . . . . . . . . . . . . . . . . . . . . . . . . . . . . . . . .8
Troubleshooting . . . . . . . . . . . . . . . . . . . . . . . . . . . . . . . . . . . . . . . . . . . . . . . . . . . . . . . . . . . . . . . .8
Specifications . . . . . . . . . . . . . . . . . . . . . . . . . . . . . . . . . . . . . . . . . . . . . . . . . . . . . . . . . . . . . . . . . .8
Warranty Information . . . . . . . . . . . . . . . . . . . . . . . . . . . . . . . . . . . . . . . . . . . . . . . . . . . . . . . . . . .24
DANGER:
Signals an EXTREME hazard.
Failure to obey a safety DANGER signal WILL result in serious injury or death to yourself or
to others.
WARNING:Signals a SERIOUS hazard.
Failure to obey a safety WARNING signal CAN result in serious injury to yourself or to others.
CAUTION:
Signals a MODERATE hazard.
Failure to obey a safety CAUTION signal MAY result in property damage or injury to
yourself or to others.
IMPORTANT! Signals special mechanical information.
NOTE: Signals additional important general information.
SYMBOL MEANING
SAFETY INFORMATION
• SAFETY ALERT SYMBOLS •
Safety alert symbols are used to draw your attention to possible dangers. These symbols, and their
explanations, deserve your careful attention and understanding. The safety warnings do not by
themselves eliminate any danger. The instructions or warnings they give are not substitutes for
proper accident prevention measures. These safety instructions are not meant to cover every
possible condition that may occur. If questions arise, please call the Customer Support
Department at 1-866-206-2707 (U.S.) or 1-877-696-5533 (Canada).
SAVE THESE INSTRUCTIONS
All information, illustrations and specifications in this manual are based on the latest product information
available at the time of printing. We reserve the right to make changes at any time without notice.
Copyright© 2015 MTD SOUTHWEST INC, All Rights Reserved.
WARNING:When using this unit, basic safety precautions should always be
followed to reduce the risk of property damage and personal injury, including the following:
SPARK ARRESTOR NOTE
NOTE: For users on U.S. Forest Land and in the states of California, Maine, Oregon and
Washington. All U.S. Forest Land and the state of California (Public Resources Codes 4442 and
4443), Oregon and Washington require, by law that certain internal combustion engines operated on
forest brush and/or grass-covered areas be equipped with a spark arrestor, maintained in effective
working order, or the engine be constructed, equipped and maintained for the prevention of fire.
Check with your state or local authorities for regulations pertaining to these requirements. Failure to
follow these requirements could subject you to liability or a fine. This unit is factory equipped with a
spark arrestor. If it requires replacement, ask your LOCAL SERVICE DEALER to install the
Accessory Part #753-06268 Muffler.
DO NOT RETURN THIS UNIT TO THE RETAILER. PROOF OF PURCHASE WILL BE REQUIRED FOR
WARRANTY SERVICE.
For assistance regarding the assembly, controls, operation or maintenance of the unit, please call the
Customer Support Department at 1-866-206-2707 in the United States or 1-877-696-5533 in Canada.
Additional information about the unit can be found on our website at www.remingtonpowertools.com.
For service, please call the Customer Support Department to obtain a list of authorized service dealers
near you. Service on this unit, both within and after the warranty period, should only be performed by
an authorized and approved service dealer. When servicing, use only identical replacement parts.
SERVICE INFORMATION
CALIFORNIA PROPOSITION 65
WARNING:
Engine exhaust, some of its constituents and certain finished
components contain or emit chemicals known to the State of California to cause cancer
and birth defects or other reproductive harm. Wash hands after handling.
Fig. 3
Kickback
Fig. 2
Kickback Danger Zone
Fig. 1
Rotational Kickback
DANGER:
Kickback may occur when the nose or tip of the guide bar touches an
object, or when the wood closes in and pinches the saw chain in the cut. In some cases, tip
contact may cause a lightening-fast reverse action, kicking the guide bar rapidly back towards
the operator. Pinching the saw chain along the top of the guide bar may push the guide bar
rapidly back towards the operator. Either of these reactions may cause a loss of control over the
saw, which could result in serious injury to the user. Contact with foreign objects within the wood
can also induce a loss of chain saw control.
769-10580 / 00 01/15
Page view 0
1 2 3 4 5 6 ... 23 24

Summary of Contents

Page 1 - Operator’s Manual

READ ALL INSTRUCTIONS BEFORE OPERATINGBASIC SAFETY PRECAUTIONS• DO NOT rely exclusively upon the safety devices built into the unit. • DO NOT allow th

Page 2 - SAFETY INFORMATION

10INFORMATIONS SUR LA SECURITÉ• Veillez à ce que la pointe du guide n’heurte aucun objettel qu’une bûche, une branche, le sol ou tout autreélément gên

Page 3

11• SYMBOLES INTERNATIONAUX ET DE SECURITÉ •Ce manuel de l’utilisateur décrit les symboles et pictogrammes de sécurité et internationaux quipeuvent

Page 4

12INSTRUCTIONS DE DÉMARRAGE ET D’ARRÊTAVANT DE DÉMARRER LE MOTEUR• Assurez-vous que la chaîne est tendue à votre convenance. Consultez Régler la tensi

Page 5

13Les petits arbres, d’un diamètre compris entre 6 et 7 pouces (15-18cm) sont généralement abattus d’un seul trait. Les arbres plus grosnécessitent de

Page 6 - CUSTOMER RESPONSIBILITY

14ENTRETIEN ET RÉPARATIONSAJUSTER LA TENSION DE LA CHAÎNELa chaîne doit être retendue chaque fois que les faces des maillon-guides retombent de la rai

Page 7

15ENTRETIEN ET RÉPARATIONSENTRETIEN DE LA CHAÎNEPour une coupe rapide et homogène, il est essentiel d’entretenir lachaîne correctement. Les conditions

Page 8 - TROUBLESHOOTING

CAUSE SOLUTION16INSTRUCTIONS DE NETTOYAGE1. Coupez le moteur et attendez que toutes les parties enmouvement se soient arrêtées.2. Laissez refroidir l’

Page 9 - Manuel de l’utilisateur

LEA TODAS LAS INSTRUCCIONES ANTES DE OPERAR LA UNIDADPRECAUCIONES BÁSICAS DE SEGURIDAD• NO se confíe exclusivamente en los dispositivos de seguridad i

Page 10 - AVERTISSEMENT :

18INFORMACIÓN DE SEGURIDAD• NO corte más de un tronco o rama a la vez.• NO retuerza la sierra al retirar la barra guía de un cortebajo al trozar.• ¡NO

Page 11 - CONSERVEZ CES INSTRUCTIONS

19CONOZCA SU UNIDAD1. BARRA GUÍA2. SIERRA DE CADENA DE BAJO CONTRAGOLPE3. TORNILLO DE REGULACIÓN DE LA CADENA4. PANTALLA DEL AMORTIGUADOR DE CHISPAS5.

Page 12

SAFETY INFORMATION2• SAFETY AND INTERNATIONAL SYMBOLS •This operator's manual describes safety and international symbols and pictographs that m

Page 13

20INSTRUCCIONES DE ARRANQUE Y PARADAANTES DE ARRANCAR EL MOTOR• Cerciórese de que la tensión de la cadena tenga el ajuste deseado. Consulte Ajustar la

Page 14 - OBLIGATIONS DU CLIENT

21• Si dos o más personas van a realizar operaciones de tala y trozado almismo tiempo, el espacio entre la tala y el trozado debe ser, al menos,el dob

Page 15

22INSTRUCCIONES DE MANTENIMIENTO Y REPARACIÓNAJUSTAR LA TENSIÓN DE LA CADENALa cadena se debe tensar siempre que los planos de los dientesarticulados

Page 16 - RÉSOLUTION DES PROBLÈMES

23MANTENIMIENTO DE LA BARRA GUÍAPara reducir al mínimo el desgaste de la barra guía, se recomiendanlos siguientes procedimientos de mantenimiento:• Gi

Page 17 - Manual del Operador

CAUSA SOLUCIÓNESPECIFICACIONES** Todas las especificaciones se basan en la información del producto más reciente disponible en el momento de laimpresi

Page 18 - INFORMACIÓN DE SEGURIDAD

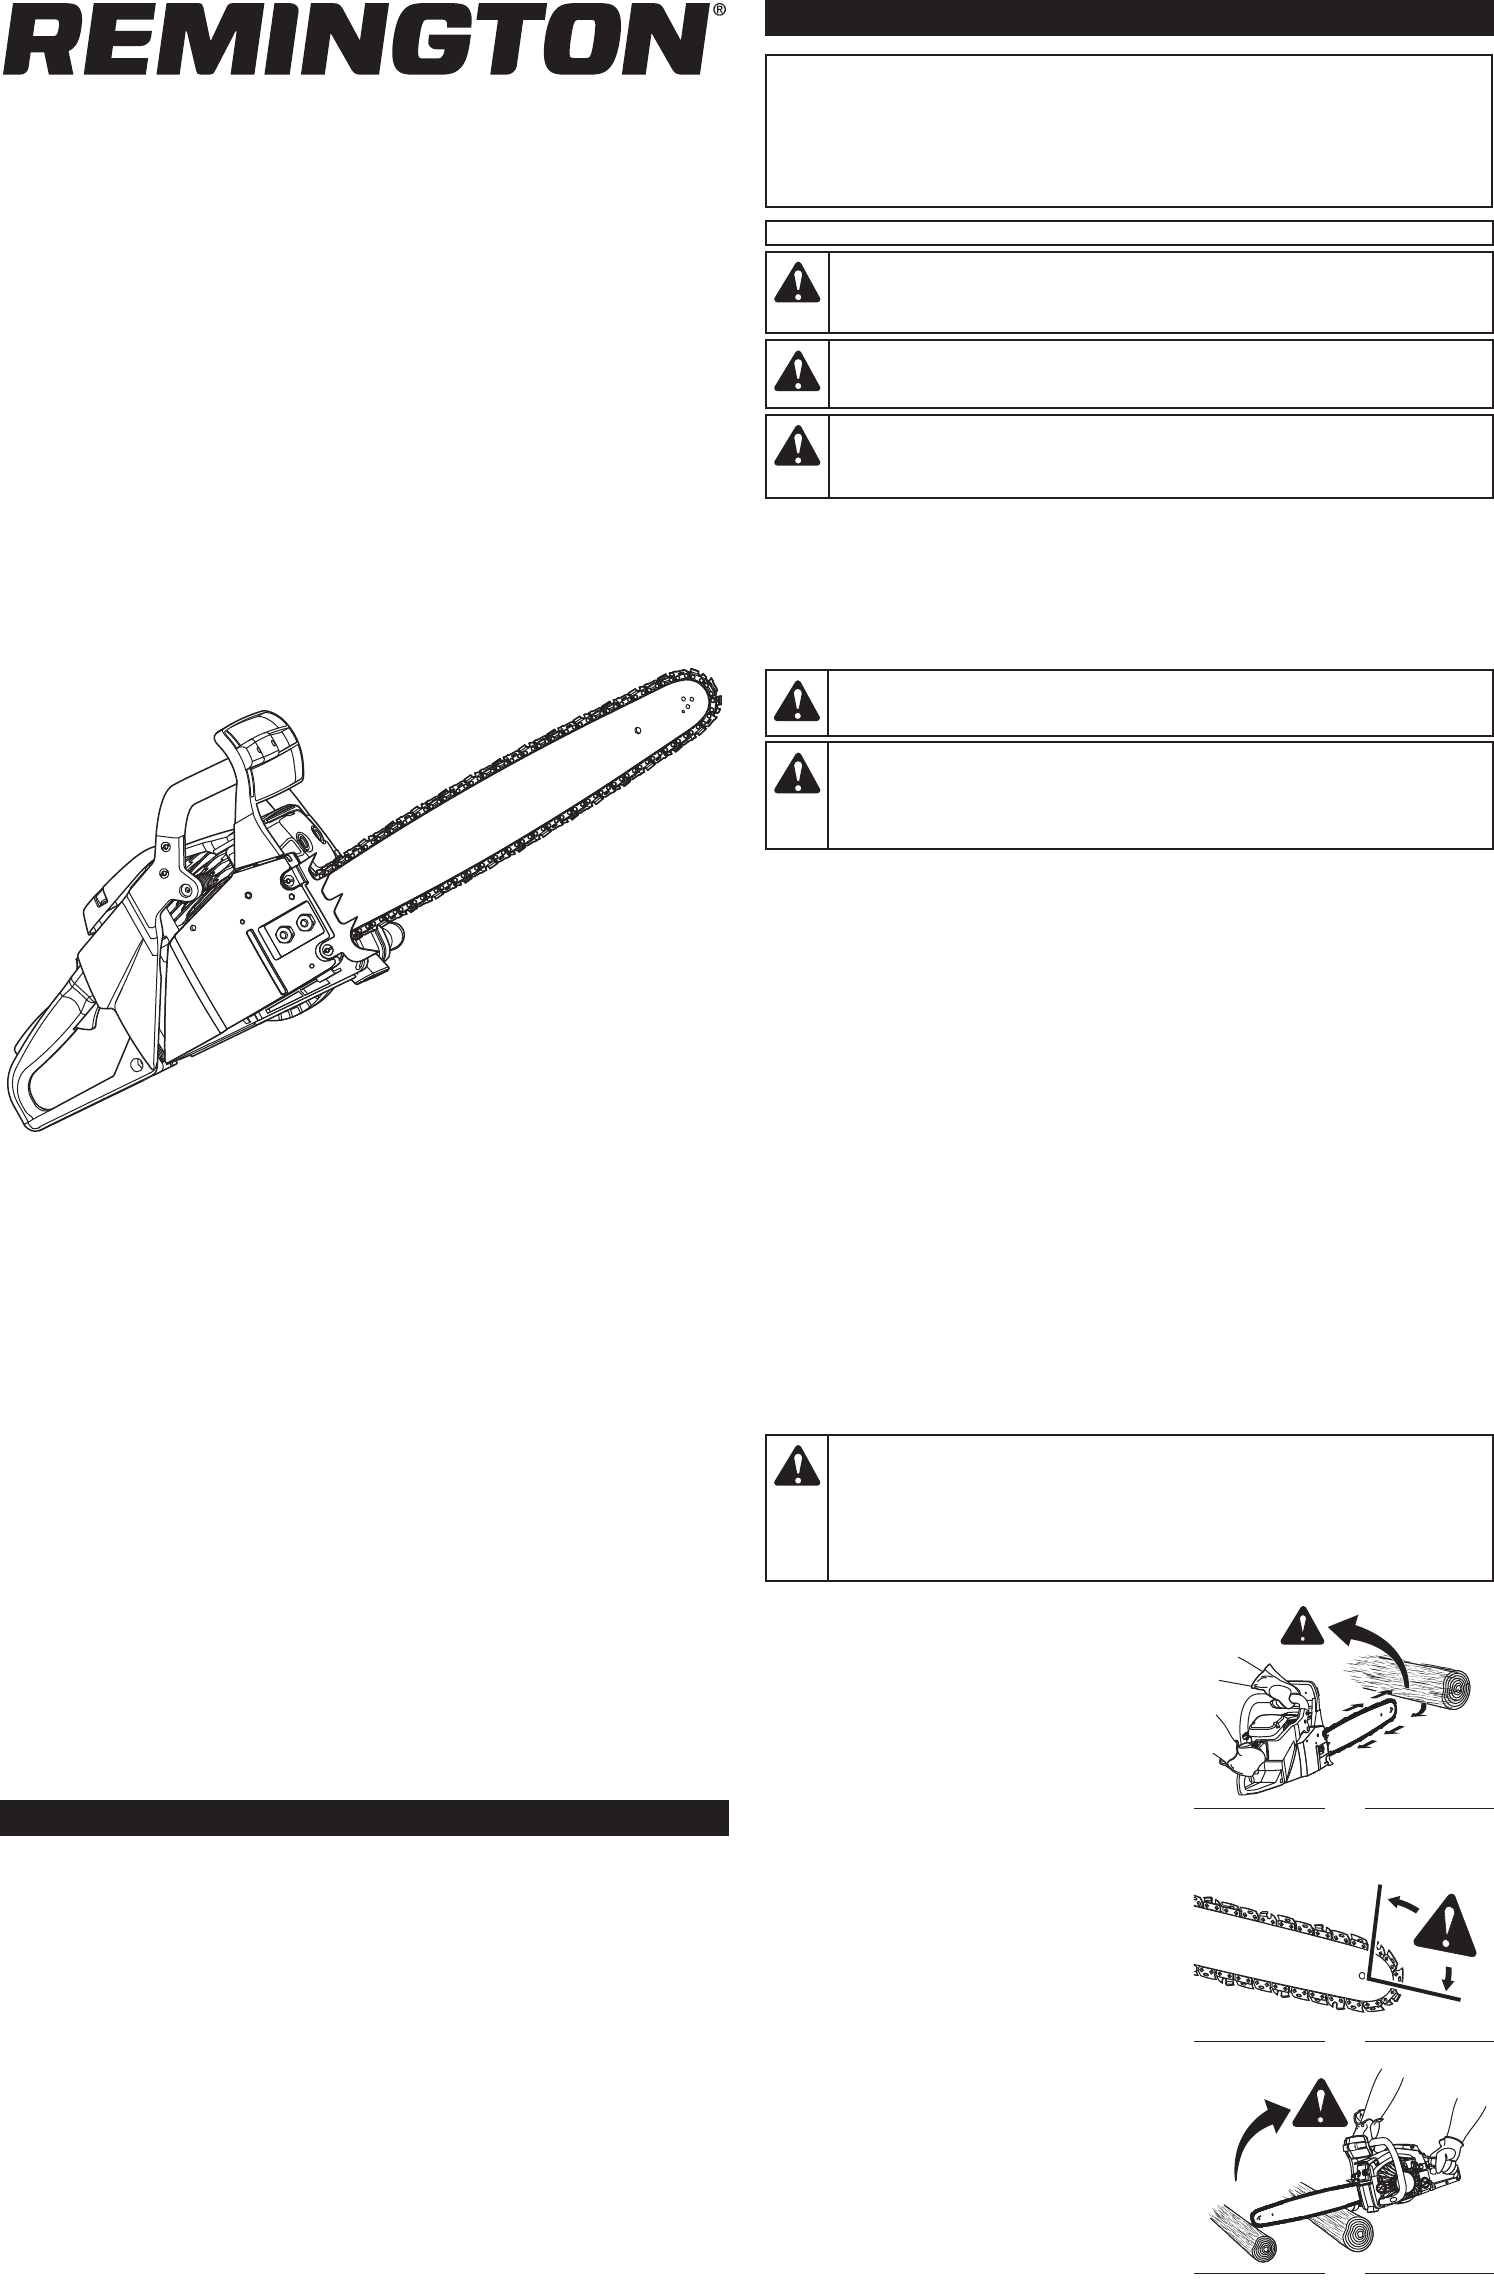
3KNOW YOUR UNIT21181016APPLICATIONSThis unit may be used for the purposes listed below:• Basic limbing, felling and woodcutting• Removing buttress roo

Page 19

STARTING AND STOPPING INSTRUCTIONSBEFORE STARTING THE ENGINE• Make sure the chain tension is at the desired setting. Refer to Adjusting the Chain Tens

Page 20

Small trees, up to 6-7 inches (15-18 cm) in diameter, are usually felledin a single cut. Larger trees require a process consisting of two maincutting

Page 21 - RESPONSABILIDAD DEL CLIENTE

MAINTENANCE AND REPAIR INSTRUCTIONSADJUSTING THE CHAIN TENSIONThe chain must be tensioned whenever the flats on the drive linkshang out of the bar gro

Page 22 - ADVERTENCIA:

MAINTENANCE AND REPAIR INSTRUCTIONSCHAIN MAINTENANCEFor smooth and fast cutting, the chain needs to be maintained properly.The following conditions in

Page 23

CAUSE SOLUTION8CLEANING INSTRUCTIONS1. Stop the engine and wait for all moving parts to stop.2. Allow the unit to cool. 3. Slacken the chain if it was

Page 24 - REMINGTON LLC

LIRE TOUTES LES INSTRUCTIONS AVANT UTILISATIONPRECAUTIONS DE SECURITE ELEMENTAIRES• NE vous fiez PAS exclusivement aux protections de sécurité incorpo

Comments to this Manuals

No comments