Remington RM170B Owner's Manual
Browse online or download Owner's Manual for Air blowers/dryers Remington RM170B. Remington RM170B Owner`s manual User Manual
- Page / 40
- Table of contents
- BOOKMARKS
- OWNER’S MANUAL 1
- DO NOT RETURN THIS PRODUCT 2
- NO DEVUELVA ESTE PRODUCTO 2
- CONTENTS 3
- SAVE THESE 4
- INSTRUCTIONS 4
- PRODUCT IDENTIFICATION 5
- SPECIFICATIONS 5
- CAUTION 6
- RECHARGEABLE BATTERY 7
- BLOWER/SWEEPER ASSEMBLY 8
- BLOWER/SWEEPER OPERATION 9
- BLOWER/SWEEPER MAINTENANCE 10
- SAVE THESE INSTRUCTIONS 11
- WARRANTY INFORMATION 12
- SOPLADORA/BARREDORA 13
- INALÁMBRICA DE 18 VOLTIOS 13
- ADVERTENCIA 15
- IDENTIFICAIÓN DEL PRODUCTO 16
- ESPECIFICACIONES 16
- BATERÍA RECARGABLE 18
- GUARDE ESTAS INSTRUCCIONES 22
- INFORMACIÓN DE GARANTÍA 23
- GUIDE DU PROPRIÉTAIRE 25
- TABLE DES MATIÈRES 26
- CONSERVEZ CES 27
- DIRECTIVES 27
- FICHE TECHNIQUE 28
- IDENTIFICATION DU PRODUIT 28
- MISE EN GARDE 29
- PILE RECHARGEABLE 30
- INFORMATION SUR LA GARANTIE 35
- FRANÇAIS 35
Summary of Contents
ENGLISHIMPORTANT: Read and understand this manual before assembling or operating this appliance. Improper use of this appliance can cause severe injur
10BLOWER/SWEEPER MAINTENANCEUse of non-Remington parts or accessories may cause personal injury or damage to the unit.REPLACEMENT PARTS1. Battery
11ENGLISHTROUBLESHOOTINGSAVE THESE INSTRUCTIONSNote: For additional help, visit www.remingtonpowertools.com. WARNING: Unplug blower/sweeper from pow
12WARRANTY INFORMATIONThe limited warranty set forth below is given by Remington LLC (“Remington”) with respect with newmerchandise purchased and used
ESPAÑOL13MODELO: RM170BSOPLADORA/BARREDORAINALÁMBRICA DE 18 VOLTIOSOWNER’S MANUAL®IMPORTANTE: Lea y entienda este manual antes de ensamblar u operar e
14Gracias por comprar esta sopladora/barredora inalámbrica de 18 voltios marca Remington.. Tenemos el orgullo de ofrecerle este producto de calidad pa
15ESPAÑOLIMPORTANTE INFORMACIÓN SOBRE LA SEGURIDADANTES DE OPERAR LA SOPLADORA/BARREDORA1. Evite ambientes peligrosos• Esta sopladora está hecha para
16IDENTIFICAIÓN DEL PRODUCTOA. Carcasa de la sopladoraB. Interruptor de ENCENDIDO/APAGADOC. Tubo de la sopladoraD. Batería E. Botón de desenganche
17ESPAÑOLBATERÍA RECARGABLETAPA PROTECTORA DEL TERMINAL DE LA BATERÍASe provee una tapa de protección para el ter-minal de la batería para usarla siem
18BATERÍA RECARGABLEEl cargador está diseñado para usar alimenta-ción estándar casera de 120 voltios y 60 Hz.1. Enchufe el cordón del cargador en la
19ESPAÑOLENSAMBLE DE LA SOPLADORA/BARRESDORA ENSAMBLE DE LA SOPLADORAENSAMBLE LA SOPLADORA COMO SE INDICASiga el paso abajo para reunir la sopladora.1
2DO NOT RETURN THIS UNIT TO THE RETAILER. PROOF OF PURCHASE WILL BE REQUIRED FORWARRANTY SERVICE.THIS PRODUCT IS COVERED BY ONE OR MORE U.S. PATENTS.
20OPERACIÓN DE LA SOPLADORA/BARRESDORA ADVERTENCIAIMPORTANTE: Esta sopladora es sólo para uso doméstico.OPERACIÓN DE LA SOPLADORA/BARRESDORAFigura 5 -
21ESPAÑOL ADVERTENCIAEl uso de repuestos o acceso-rios que no son de Remington pueden provocar lesiones per-sonales o daños a la unidad.ELIMINACIÓN
22ANÁLISIS DE AVERĺASFALLA OBSREVADA CAUSA POSIBLE SOLUCIÓNLa sopladora no arranca cuando pone el interruptor en la posición “on”1. La batería no est
23ESPAÑOLINFORMACIÓN DE GARANTÍARemington LLC concede la garantía limitada establecida debajo para mercancías nuevas que seancompradas y usadas en los
24NOTES/NOTAS ________________________________________________________________________________________________________________________________________
FRANÇAIS25MODÈLE: RM170BSOUFFLEUSE/BALAYEUSE SANS FIL 18VGUIDE DU PROPRIÉTAIRE®IMPORTANT: Vous devez bien lire et comprendre ce guide avant de débuter
26Merci d’avoir acheté cette souffl euse/balayeuse Remington 18 V. Nous sommes fi ers de vous offrir ce produit de qualité pour vous aider à ef-fectuer
27FRANÇAISAVANT D’UTILISER LE SOUFFLEUSE/BALAYEUSE1. Évitez les endroits dangereux:• Ce souffl eur est conçu pour être utilisé à l’intérieur comme à l
28A. Boîtier de la souffl euseB. InterrupteurC. Tube du souffl eurD. PileE. Bouton de déclenchement de la pileF. Chargeur de pileG. Socle du charg
29FRANÇAISPILE RECHARGEABLECAPUCHON DE PROTECTIONDES BORNES DE LA PILEDes capuchons protecteurs de bornes sont fournis; apposez-les sur les bornes cha
3ENGLISHThank you for purchasing this Remington brand 18Volt Cordless Blower/Sweeper. We are proud to offer this quality product to assist you in keep
30PILE RECHARGEABLE4. Débranchez le chargeur. Retirez la pile en la faisant glisser (Voir la Figure 3).5. Placez la pile dans l’outil et assurez-vou
31FRANÇAISASSEMBLAGE DE LA SOUFFLEUSE/BALAYEUSEASSEMBLEZ LA SOUFFLEUSE, COMME INDIQUÉ.Suivez les étapes ci-dessous pour assembler le souffl eur. 1. In
32UTILISATION DU SOUFFLEUSE/BALAYEUSEIMPORTANTE: Cette souffl euse est réservée à un usage résiden-tiel.UTILISATION DU SOUFFLEUSE/BALAYEUSEUTILISATION
33FRANÇAISENTRETIEN ET NETTOYAGEENTRETIEN DU SOUFFLEUSE/BALAYEUSEPIÈCES DE RECHANGE1. Pile 725-050322. Chargeur de pile 72
34DÉPANNAGESAVE THESE INSTRUCTIONSDÉFAILLANCE OVSERVÉE CAUSE POSSIBLE REMÈDE Le balayeuse/souffl euse ne dé-marre pas lorsque vous appuyez sur la
INFORMATION SUR LA GARANTIE35FRANÇAISLa garantie limitée énoncée ci-après est accordée par Remington LLC et concerne les marchandisesneuves achetées e
37NOTES/NOTAS ________________________________________________________________________________________________________________________________________
38NOTES/NOTAS ________________________________________________________________________________________________________________________________________
4IMPORTANT SAFETY INFORMATIONBEFORE OPERATING BLOWER/SWEEPER1. Avoid Dangerous Environments• This blower is intended for outdoor use. Do not operate
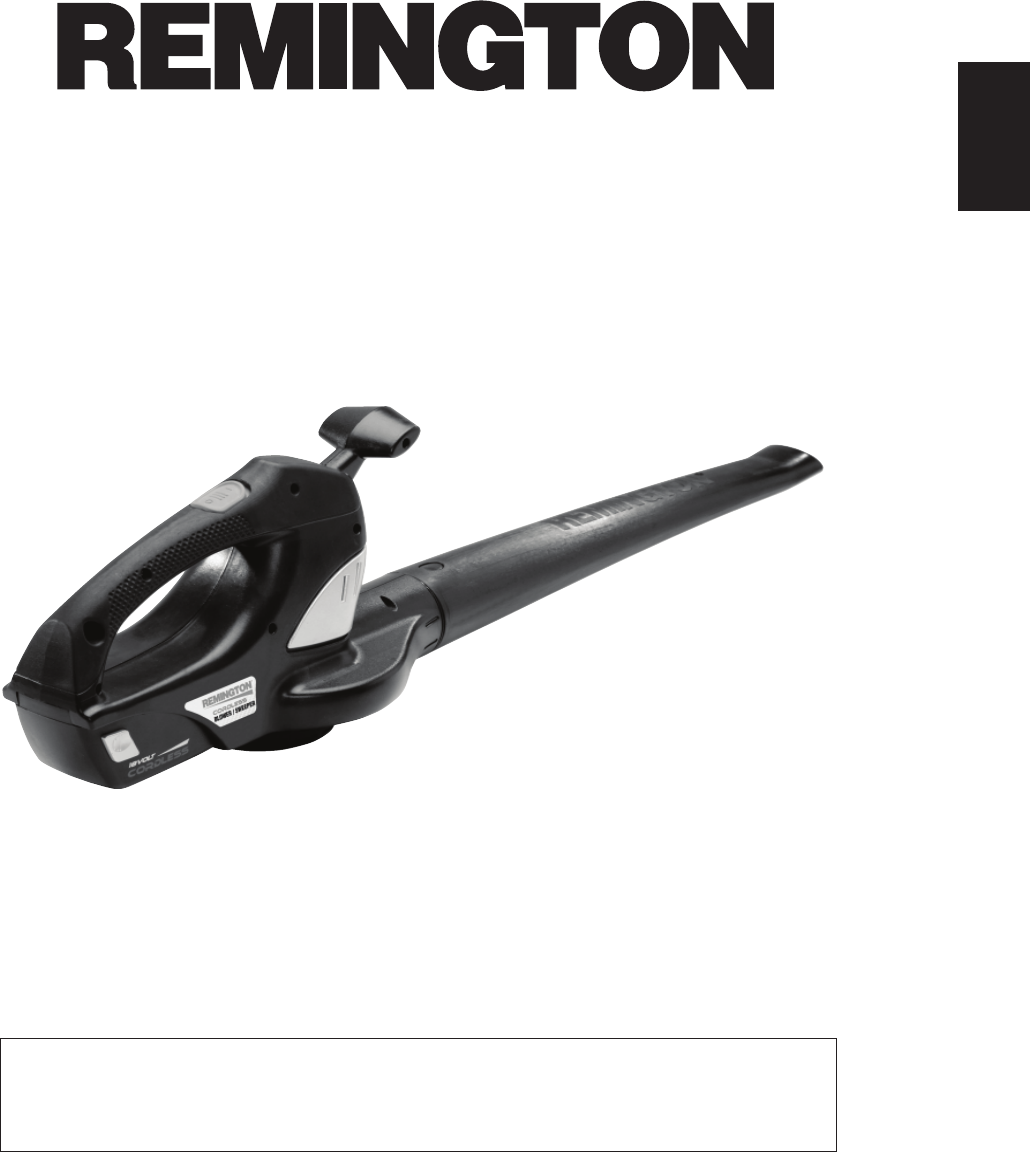
5ENGLISHPRODUCT IDENTIFICATIONA. Blower HousingB. On/Off SwitchC. Blower TubeD. BatteryE. Battery Release ButtonF. Battery ChargerG. Charger Base H
6PROTECTIVE BATTERY TERMINAL CAPDo not store or carry battery so that metal objects can con-tact exposed battery terminals. For example, do not place
7ENGLISH2. Plug the charger into any standard 120 Volt 60 Hz electrical outlet. IMPORTANT: Do not charge by means of an engine generator or DC power
8BLOWER/SWEEPER ASSEMBLYASSEMBLING BLOWERASSEMBLE BLOWER AS INDICATEDFollow the steps below to assemble the blower. 1. Slide the blower tube onto out
9ENGLISHBLOWER/SWEEPER OPERATIONIMPORTANT: This blower is for household use only.OPERATING THE BLOWER/SWEEPERBLOWER OPERATIONFigure 5 - Holding blowe
More documents for Air blowers/dryers Remington RM170B

Related products and manuals for Air blowers/dryers Remington RM170B


 (38 pages)
© 2020, manymanuals.com. All rights reserved. | 0.701 s |
 Manymanuals.com
 Manymanuals.de
 Manymanuals.fr
 Manymanuals.it
 Manymanuals.pl
 Manymanuals.cz
 Manymanuals.es
 Manymanuals-pt.com
Comments to this Manuals